|
  6.1
As I go... 6.1
As I go...
...
down the drain? Into fits of rage? To enjoy the lived-happily-ever-after
life? Well... sort of. (Actually, as I'm writing this the Dutch are loosing
a football game, it's 2006 and... oh well. Great stuff. Good thing I put
twelve bottles on Russia. That way I'm happy either way, if the Dutch win,
it's national pride, and if the Russian win, it's economic advantage (and
a historical hangover). What's there to lose? :-))
After
the primer, my biggest problem turned out to be: where to go next... That
had to be graphics. Fortunately, I'm not suffering from any serious amounts
of knowledge or unsolvable problems (and none of the solutions required
Viagra... yet :-))
There's
only so much I can cook up, and I can't and won't duplicate the help file.
Some commands (especially DrawingMode()) may be confusing at first... Experimenting
is they key here, try and play. If anyone has specific questions that are
simple enough for me to understand, then I will add some (silly) little
samples. Don't expect too much though, I'm not an expert!
This
page got too large, and I've splitted it up. Check the next
page for more 2D Graphics related material.
If
you are an expert, then you may want to have a look at the PureBasic Team
Blog for August 2009...
6.2
Basic 2D drawing
This
kind of drawing uses regular Windows GDI functions and / or PureBasic specific
drawing routines... They work on all versions and hardware, and don't use
anything fancy. No DirectX stuff... no sprites, no screens, no flip buffers,
no nothing sir... Slow, safe, serious. If you look at the help file you
will find all related commands grouped under the header 'General Libraries
/ 2D drawing'.
A few
commands that I will dare to touch...
The thing
to keep in mind is that normally you DO NOT draw directly on screen. You
don't control what is shown on the screen, Windows does. What you can do
is create the picture in memory and tell windows to display that picture
somewhere on screen.
1.
create a bitmap in memory (a place where the image is stored)
2.
draw upon the bitmap
3.
create a window
4.
create a 'gadget' in that window that will be used to show the image
5.
show the image
Easy,
isn't it? :-)
Create
a bitmap
bitmap1_nr
= 1
; image number 1
bitmap1_h
= CreateImage(bitmap1_n,400,400) ; create
the image and store the handle
There
is no real need to store the bitmap handle now, you can easily retrieve
it using:
bitmap1_h
= ImageID(bitmap1_n)
It's a
matter of taste, after all... Some may prefer using #PB_Any...
bitmap1_nr
= CreateImage(#PB_Any,400,400)
bitmap1_h
= ImageID(bitmap1_nr)
Before
4.40 the bitmap created was based upon the desktop or screen you were using.
As of 4.40 the default colour depth is 24
Pre
4.40 you were allowed to create different bitmap depths. As of 4.50 this
is no longer possible, as the PureBasic developers fully rewrote all graphic
drawing routines, so now you can only choose between 24 and 32 bits. (Somewhere
along the way this change came along, I forgot which version :-))
;
pb 4.40b1 or earlier
;
;
does NOT work in 4.50 or later!
;
bitmap1_nr
= 1
; image number 1
bitmap1_h
= CreateImage(bitmap1_n,400,400,16) ; create a 16 bits image
and store the handle
Be aware
that as of 4.40b1 alpha channels are now supported (using 32 bits depth).
;
pb 4.50
;
bitmap1_nr
= 1
; image number 1
bitmap1_h
= CreateImage(bitmap1_n,400,400,32) ; create a 32 bits image
and store the handle
Note:
to keep things simple I'd suggest to stick to 24 bits for now, until you
are going to use alpha channels.
It's
interesting to see how newer video drivers have dropped the lower (desktop)
resolutions (they may still work with DirectX screens
though). Another name for 24 or 32 bits is TrueColor.
16 bits, appearently, isn't considered good enough to be called 'TrueColor'
in most video drivers and is called 'HiColor' in some, 'Medium' in others.
Sometimes '32 bits' in the driver means '24 bits with hardware alpha channel
enabled' and so on. With new hardware just select the highest mode and
ignore everything else :-)
Newer
cards and / or video drivers may not even support lower resolutions anymore.
On my Dell XPS710 with a GeForce 8800GTX all that's on offer is medium
(16 bits) or high (32 bits). (Note that often other modes are still available,
they're just not shown. They are typically used for DirectX screens and
will be listed if you run this code.)
Colordepth
Each
pixel in your image has a color. There are several ways to specify a color,
but we'll stick to two: truecolor and indexed. Although PureBasic now only
supports 24 and 32 bits truecolor in memory, it's important enough to understand
what's going on, as you may be trying to read images created in other software.
TrueColor,
16, 24 and 32 bits
Truecolor
is the easiest form, and exists in 16, 24 and 32 bits flavours. Each pixel
has 2 bytes (16), 3 bytes (24 bits) or 4 bytes (32 bits) allocated.
When
running 24 bits, the first 8 bits stand for the amount of RED, the next
8 for GREEN, and the last 8 for BLUE. Darkest (lowest) is 0, lightest (highest)
is 255. So black would be RGB(0,0,0) and white would be RGB(255,255,255).
16 bits truecolor mode seems to use less bits for each colour.
32
bits color depth is pretty much the same as 24 bits, except for an added
8 bits that describes the amount of transparency for each specific pixel.
More about that later. I'm not so sure
if it actually matters if your video card has 24 or 32 bits color... In
fact, I wonder what it is doing with those extra 8 bits?
 Indexed,
1, 2, 4, and 8 bits Indexed,
1, 2, 4, and 8 bits
Note
that PureBasic can read and handle these kind of images, but as of 4.40
it's using only 24 or 32 bits internally. The information below is kept
for a better understanding of the different image formats, and their usage
in the days of old prior to 4.50. Skip
if you don't care...
In
indexed images the color information is stored in two different places.
First there is a table (the color index, or color palette) that contains
a list of all possible colors. In an image with 2 bits colordepth there
are only 2^2 = 4 colors possible. In an image with depth of 4 there are
16 colours possbile, and so on.
Each
pixel has a number of bits allocated. If the image has a color depth of
2, each pixel will have 2 bits allocated for its color information. The
number stored for each pixel redirects to the actual color in the table.
Confused? Good! I'm not very good at explaining this :-) but this little
example may make it clearer:
An
image with two bits colour depth has maximal 4 colours, the colour table
has only 4 positions, and each pixel has two bits assigned to it. First
a possible table:
;
index 0 contains 0,0,0 (black)
;
index 1 contains 255,0,0 (red)
;
index 2 contains 128,128,128 (grey)
;
index 3 contains 255,255,255 (white)
The very
first pixel in our image has the value %01 (remember, only two bits per
pixel). This maps to index 1 so this pixel will be shown as red. The second
pixel contains %11 which maps to index 3 which is white. Obvously we cannot
draw a blue line in this image... there's no colour blue in the table!
And if we would replace, for example, index 0 with blue, we wouldn't be
able to use black in the image (and effectively all black pixels would
be turned blue).
Then
why use this old format? Well, it takes less space in memory, so sometimes
these images with lower colour depths can come in quite handy, although
you have to be very careful how you set up your colour index.
Some
good (or bad) news about PureBasic for Windows is how lower colour depths
are handled... When drawing an image, Windows (or PureBasic) decides for
you how it fills in the palette, and how it translates a lower depth image
to a higher depth image or screen. The following code creates four different
images in different image depths, and draws on each one the same mix of
coloured pixels and lines. Run this a few times and see your computer
juggle around the colour depth depending indexes...
;
survival guide 6_2_150 colour depth
;
pb 4.40b1 or earlier
;
;
does NOT work in 4.50 or later!
;
OpenWindow(1,0,0,256,256,"graphics1",#PB_Window_SystemMenu|#PB_Window_ScreenCentered)
CreateImage(1,256,256,24)
ImageGadget(1,0,0,256,256,ImageID(1))
;
For
n = 2 To 5
color_depth = Pow(2,n)
CreateImage(2,64,256,color_depth)
StartDrawing(ImageOutput(2))
For y = 0 To 255
linecolor = RGB(y,(y*2) % 256, (y*4) % 256)
FrontColor(linecolor)
LineXY(35,y,61,y)
Next y
For x = 0 To 32
For y = 0 To 255
If y < 128
plotcolor = RGB(255*x/32,y/256,255*y/128)
Else
plotcolor = RGB(255*x/32,y/256,511-2*y)
EndIf
FrontColor(plotcolor)
Plot(x,y)
Next y
Next x
StopDrawing()
StartDrawing(ImageOutput(1))
DrawImage(ImageID(2),(n-2)*64,0)
StopDrawing()
SetGadgetState(1,ImageID(1))
Next
n
;
Repeat
event = WaitWindowEvent()
Until
event = #PB_Event_CloseWindow
I haven't
been able to figure out how palettes for these lower colour depth images
are set up. If you want to be safe: use an external paint program for maximal
palette control when creating those images. Not that it matters much anymore
with fast PC's and newer versions of PureBasic :-)
Drawing
on the bitmap
Before
drawing, we need to tell the system where to draw. Before 4.00 we had to
use the (horrible) UseImage() command. Fortunately, this thing is no more.
In the old days...
;
pre pb 4.00
;
UseImage(bitmap1_nr)
; select an image
StartDrawing(ImageOutput())
; where to draw
...
The new
version:
;
pb 4.00 and later
;
StartDrawing(ImageOutput(bitmap1_nr))
...
Still
all drawing has to take place between StartDrawing()
and StopDrawing()
StartDrawing(...)
...
; this is where all drawing commands should go
StopDrawing()
The parameter
behind StartDrawing() tells the system where the output goes to. You can
draw on images, on sprites, etc..
There
are a bunch of drawing commands, you can find them in the help file...
Let's draw a single line in white:
FrontColor(RGB(255,255,255))
; use white
LineXY(10,10,390,390)
; draw a line
Note
that with some commands you have to use the number and for other commands
the handle / ID!
Nice
and consistent, this :-( but from a multi OS point of view it just may
make sense... (It definitely allows you to use some Windows only tricks.)
Showing
the image
With
a few lines we can create a bitmap in memory, but we still need to show
that bitmap somewhere... the best way to do so is using an image gadget,
a placeholder that will show the bitmap. (Why? Because that way we don't
have to take care of refreshing and / or updating.) To use an image gadget
we need to open a window and then
create the image gadget:
w_main_h
= OpenWindow(1,0,0,400,400,"graphics1",#PB_Window_SystemMenu|#PB_Window_ScreenCentered)
...
ImageGadget(gadget1_nr,0,0,500,400,bitmap1_h)
; create an image gadget using image1
You can
update any image gadget with a new bitmap:
SetGadgetState(gadget1_nr,bitmap1_h)
If you
haven't got the image (bitmap) ready yet, you could specify zero (0) instead
of a real image handle, which will simply leave the imagegadget blank.
Here's
a complete example:
;
survival guide 6_2_160 showing the image
;
pb 4.60b4
;
w_main_h
= OpenWindow(1,0,0,400,400,"graphics1",#PB_Window_SystemMenu|#PB_Window_ScreenCentered)
;
bitmap1_nr
= 1
; image number 1
bitmap1_h
= CreateImage(bitmap1_nr,400,400) ; create
the image and store the handle
gadget1_nr
= 1
ImageGadget(gadget1_nr,0,0,500,400,bitmap1_h)
; create an image gadget using image1
;
StartDrawing(ImageOutput(bitmap1_nr))
; start drawing
FrontColor(RGB(255,255,255))
; use white
LineXY(10,10,390,390)
; draw a line
StopDrawing()
; we're done drawing
;
SetGadgetState(gadget1_nr,bitmap1_h)
; update gadget
;
Repeat
event = WaitWindowEvent()
Until
event = #PB_Event_CloseWindow
A bit
more on the use of the ImageGadget as a placeholder: Windows normally does
not maintain the contents of a window for you, you have to do that yourself.
One way around that is to draw on an image in memory, and show that image
on a gadget. Windows / PureBasic DOES maintain the contents of a gadget,
so that fixes that little problem. (One day, nobody needs Viagra anymore
:-))
Drawing
an image on top of another image
You
can draw images on other images using the DrawImage() command. Assume you
have one large image of a clouded sky (image number 1) and you want to
place a little airplane (image number 2) on top of it. Notice that ImageOutput
uses the number whilst DrawImage
uses the ID or handle.
...
StartDrawing(ImageOutput(bitmap1_nr))
DrawImage(ImageID(bitmap2_nr),x,y)
StopDrawing()
...
Of course
it also goes the other way around, turn a part of an image into a new image,
by using either GrabDrawingImage() or GrabImage(). See the help file for
more details.
StartDrawing()
This
command is an interesting beast. It tells PureBasic where to go with all
the stuff being drawn. You do so by adding one of the following commands
as a parameter:
-
ImageOutput()
-
WindowOutput()
-
ScreenOutput()
-
PrinterOutput()
-
SpriteOutput()
-
TextureOutput()
See the
help file (you know, the one you get when pressing the [F1] key) for each
entry.
Each
StartDrawing() command must be paired with a StopDrawing() command.
Colours
There
are different ways to specify a colour in PureBasic. Assume you have a
24 bits image, so each pixel can have 2^24 colours, ie. each pixel can
have a value of 0 (totally black) to 16777216 (totally white). In hexadecimal
from $000000 to $FFFFFF. We could calculate the values like this:
r
= 0
g
= 0
b
= 0
rgb
= b * 256 * 256 + g * 256 + r
Debug
rgb
... But
that isn't exactly comfortable. (Note that although we talk about RGB,
the information is actually stored in memory as BGR, in case you ever want
to manipulate data directly.) PureBasic has a command that does this calculation
for us, both ways:
r
= 32
g
= 64
b
= 128
;
;
doing it ourselves
;
rgb
= b * 256 * 256 + g * 256 + r
Debug
rgb
;
;
using the RGB() statement
;
Debug
RGB(r,g,b)
;
;
and reverse: retrieving the color component from the value
;
Debug
Red(rgb)
Debug
Green(rgb)
Debug
Blue(rgb)
FrontColor
and BackColor()
You
can specify the colour for all PureBasic's more 'primitive' drawing commands.
Some commands only take a single colour:
FrontColor(RGB(32,64,128))
LineXY(10,10,100,100)
Some commands
take a front and back colour, for example the following would draw black
text in a massive white box:
FrontColor(RGB(0,0,0))
; text (front) in black
BackColor($FFFFFF)
; background (back) in white
DrawText(10,10,"Text")
The FrontColor()
and BackColor() statements specify the default colour for all subsequent
drawing commands. You can also specify a front and back colour when calling
a drawing command:
;
everything using the specified colour
;
FrontColor(RGB(32,64,128))
LineXY(10,10,100,100)
;
;
or specified per line
;
LineXY(10,10,100,100,RGB(32,64,128))
Other
drawing commands
Check
out the entries in the help file under general libraries / 2D drawing,
where all regular drawing commands are listed. Note that most commands
are 'clipped'. If you try to draw 'outside' the bitmap, nothing happens...
except for Plot().
| StartDrawing() |
defines
where all output goes to |
| StopDrawing() |
all
drawing commands have to go between a StartDrawing() and EndDrawing() |
| DrawingMode() |
style
of drawing (xor, include background, outline, and more) |
| FrontColor()
BackColor() |
specify
color for for or background |
| RGB()
RGBA() |
24
bit color value specified by R G B component, or alpha channel value |
| Blue()
Red() Green() |
retrieve
color component from a 24 bit value |
| Box() |
draw
a box |
| Line() |
draw
a line from an absolute point to a relative position |
| LineXY() |
draw
a line from an absolute point to another absolute point |
| FillArea() |
fills
an enclosed area with a color or gradient |
| Plot() |
draw
a single point, not clipped! |
| Circle()
Ellipse() |
draw
a circle or an ellipse |
| DrawImage() |
draw
(copy and optionally resize) a given bitmap |
| Point() |
retrieve
the color from a single point |
| GrabImage()
GrabDrawingImage() |
create
a new iamge using a section of the specified image |
| DrawText() |
draw
a text on a position specified by Locate() |
| DrawingFont() |
font
to use for text |
| ... |
see
the help file for more more more! |
Plot()
is NOT clipped. Using the wrong parameters for Plot() can and will crash
your program.
6.3
The Alpha channel
Remember
32 bits? 8 bits for red, 8 for green, 8 for blue. And then 8 more, for
'transparency', the so called 'alpha channel'. These eight bits allow us
to do some fancy things with images. The Window build-in drawing routines
do not (fully) support transparencies, so the PureBasic developers wrote
their own drawing routines as of 4.50... They clever people are me think
I not am. At least, that's what master Yoda said to young Luke.
Clever
people, nevertheles.
Here's
the basic concept: each 32 bits image contains the afrementioned 8 bits
for red, 8 for green, and 8 for blue. The fourth set of 8 bits act as an
effect controller. They do not affect the image itself, but how it is processed
by other commands.
For
example, if we create an image and make it fully transparent and then draw
it on an image gadgat, we will see... nothing. Perhaps that is not enitrely
correct, what we will see is the gadget's natural color. (On my machine
that's grey.) Appearently, drawing on an ImageGadget processes the image
information and notices it's all transparent pixels. Run the following
code:
;
survival guide 6_3_100 alpha channel
;
pb 4.60b4
;
Enumeration
#w_main
#g_image
#i_result
EndEnumeration
;
OpenWindow(#w_main,10,10,810,800,"Test",#PB_Window_ScreenCentered|#PB_Window_SystemMenu)
AddKeyboardShortcut(#w_main,#PB_Shortcut_Escape,1)
CreateImage(#i_result,810,800,32)
;
StartDrawing(ImageOutput(#i_result))
;
; fill the alpha values with 0, ie. fully transparent
;
DrawingMode(#PB_2DDrawing_AlphaChannel)
Box(0,0,810,800,RGBA(0,0,0,0))
;
Debug Alpha(Point(20,20))
StopDrawing()
;
ImageGadget(#g_image,0,0,810,800,ImageID(#i_result))
Repeat
event = WaitWindowEvent()
Until
event = #PB_Event_CloseWindow Or event = #PB_Event_Menu
The code
above creates an image, fulls the whole apha channel with value 0, and
reports the value of the alpha channel at pixel 20,20, which is (not surprising)
0....
I could
change the amount of transparency by changing the alpha component line
19 to:
Box(0,0,810,800,RGBA(0,0,0,255))
So without
further ado these seem to be the basic rules when dealing with alpha channels
in PureBasic:
-
the alpha
value does not define the transparency of the image itself
-
the alpha
channel is used by certain commands when doing something with or to the
image
-
an alpha
value of 0 means fully transparent, an alpha channel of 255 means solid
-
commands
act different depending on drawing mode
Honestly,
I've been struggling with this, that's the problem if you don't have your
own Ben Kenobi or Yoda around :-)
Backwards
compatibile
The
PureBasic team never had many troubles with breaking the rules, but for
the new alpha channel stuff in PureBasic 4.40 they have chosen to stay
backwards compatible. The (first) documentation on 4.40 forgot to mention
this though, so I had some troubles understanding it at all. (And wouldn't
have done so without the PureBasic forum, never underestimate the power
of the forum!)
One
of the commands I've skipped thus far is DrawingMode(). (Check the PureBasic
help file for all options.) DrawingMode() tells PureBasic not what
to do but how. It's also the most important player when it comes
to being backwards compatible.
Here's
how the behaviour of PureBasic changes:
| command |
'default'
mode |
'alpha'
modes |
| Point() |
returns
RGB value |
returns
RGBA value |
| Box()
Circle() Line() etc. |
only
sets RGB but not A value in destination |
sets
RGBA value in destination |
Especially
Point() can be confusing. Say you have been drawing in different modes,
and the last command you used was in 'default' mode, then a Point() command
would return the value 0 for the alpha channel, regardless of the actual
value. No issue if you know. I didn't...
DrawingMode()
Our
primary suspect. Check out the sample below. It will draw 4 boxes again
and again, on different background colours and transparencies. The first
box is solid red, the second and third are half transparent red, and the
fourth is fully transparent red. If you run the program you can see the
effect of drawing with the different drawing modes. You can combine some,
but the results are not always what one would expect.
;
survival guide 6_3_200 drawing mode
;
pb 4.60b4
;
Enumeration
#w_main
#g_image
#i_result
EndEnumeration
;
OpenWindow(#w_main,10,10,870,6*130,"DrawingMode()",#PB_Window_ScreenCentered|#PB_Window_SystemMenu)
AddKeyboardShortcut(#w_main,#PB_Shortcut_Escape,1)
CreateImage(#i_result,870,6*130,32)
;
StartDrawing(ImageOutput(#i_result))
;
; top three sections are black
;
DrawingMode(#PB_2DDrawing_Default)
Box(0,0,870,6*130,RGB(0,0,0))
;
; first section transparent (alhpa 0)
;
DrawingMode(#PB_2DDrawing_AlphaChannel)
Box(0,0*130,870,3*130,RGBA(0,0,0,0))
DrawingMode(#PB_2DDrawing_AlphaBlend|#PB_2DDrawing_Transparent)
DrawText(10,1*130-125,"fully transparent black background",RGBA(255,255,255,255))
;
; second section half solid (alpha 128)
;
DrawingMode(#PB_2DDrawing_AlphaChannel)
Box(0,1*130,870,130,RGBA(0,0,0,128))
DrawingMode(#PB_2DDrawing_AlphaBlend|#PB_2DDrawing_Transparent)
DrawText(10,2*130-125,"half transparent black background",RGBA(255,255,255,255))
;
; third section solid (alpha 255)
;
DrawingMode(#PB_2DDrawing_AlphaChannel)
Box(0,2*130,870,130,RGBA(0,0,0,255))
DrawingMode(#PB_2DDrawing_AlphaBlend|#PB_2DDrawing_Transparent)
DrawText(10,3*130-125,"solid black background",RGBA(255,255,255,255))
;
; bottom three sections will be white
;
DrawingMode(#PB_2DDrawing_Default)
Box(0,3*130,870,3*130,RGB(255,255,255))
;
; fourth section transparent (alhpa 0)
;
DrawingMode(#PB_2DDrawing_AlphaChannel)
Box(0,3*130,870,130,RGBA(0,0,0,0))
DrawingMode(#PB_2DDrawing_AlphaBlend|#PB_2DDrawing_Transparent)
DrawText(10,4*130-125,"fully transparent white background",RGBA(0,0,0,255))
;
; fifth section half solid (alpha 128)
;
DrawingMode(#PB_2DDrawing_AlphaChannel)
Box(0,4*130,870,130,RGBA(0,0,0,128))
DrawingMode(#PB_2DDrawing_AlphaBlend|#PB_2DDrawing_Transparent)
DrawText(10,5*130-125,"half transparent white background",RGBA(0,0,0,255))
;
; sixth section solid (alpha 255)
;
DrawingMode(#PB_2DDrawing_AlphaChannel)
Box(0,5*130,870,130,RGBA(0,0,0,255))
DrawingMode(#PB_2DDrawing_AlphaBlend|#PB_2DDrawing_Transparent)
DrawText(10,6*130-125,"solid white background",RGBA(0,0,0,255))
;
For row = 0 To 5
;
x = 10
y = 50+row*130
;
DrawingMode(#PB_2DDrawing_AlphaBlend|#PB_2DDrawing_Transparent)
DrawText(x,y-25,"default",RGBA(255,0,0,255))
DrawingMode(#PB_2DDrawing_Default)
Box(x,y,40,40,RGBA(255,0,0,255))
Box(x+10,y+10,40,40,RGBA(255,0,0,128))
Box(x+20,y+20,40,40,RGBA(255,0,0,128))
Box(x+30,y+30,40,40,RGBA(255,0,0,0))
;
x = x+130
DrawingMode(#PB_2DDrawing_AlphaBlend|#PB_2DDrawing_Transparent)
DrawText(x,y-25,"transparent",RGBA(255,0,0,255))
DrawingMode(#PB_2DDrawing_Transparent)
Box(x,y,40,40,RGBA(255,0,0,255))
Box(x+10,y+10,40,40,RGBA(255,0,0,128))
Box(x+20,y+20,40,40,RGBA(255,0,0,128))
Box(x+30,y+30,40,40,RGBA(255,0,0,0))
;
x = x+130
DrawingMode(#PB_2DDrawing_AlphaBlend|#PB_2DDrawing_Transparent)
DrawText(x,y-25,"xor",RGBA(255,0,0,255))
DrawingMode(#PB_2DDrawing_XOr)
Box(x,y,40,40,RGBA(255,0,0,255))
Box(x+10,y+10,40,40,RGBA(255,0,0,128))
Box(x+20,y+20,40,40,RGBA(255,0,0,128))
Box(x+30,y+30,40,40,RGBA(255,0,0,0))
;
x = x+130
DrawingMode(#PB_2DDrawing_AlphaBlend|#PB_2DDrawing_Transparent)
DrawText(x,y-25,"outlined",RGBA(255,0,0,255))
DrawingMode(#PB_2DDrawing_Outlined)
Box(x,y,40,40,RGBA(255,0,0,255))
Box(x+10,y+10,40,40,RGBA(255,0,0,128))
Box(x+20,y+20,40,40,RGBA(255,0,0,128))
Box(x+30,y+30,40,40,RGBA(255,0,0,0))
;
x = x+130
DrawingMode(#PB_2DDrawing_AlphaBlend|#PB_2DDrawing_Transparent)
DrawText(x,y-25,"blend",RGBA(255,0,0,255))
DrawingMode(#PB_2DDrawing_AlphaBlend)
Box(x,y,40,40,RGBA(255,0,0,255))
Box(x+10,y+10,40,40,RGBA(255,0,0,128))
Box(x+20,y+20,40,40,RGBA(255,0,0,128))
Box(x+30,y+30,40,40,RGBA(255,0,0,0))
;
x = x+130
DrawingMode(#PB_2DDrawing_AlphaBlend|#PB_2DDrawing_Transparent)
DrawText(x,y-25,"clip",RGBA(255,0,0,255))
DrawingMode(#PB_2DDrawing_AlphaClip)
Box(x,y,40,40,RGBA(255,0,0,255))
Box(x+10,y+10,40,40,RGBA(255,0,0,128))
Box(x+20,y+20,40,40,RGBA(255,0,0,128))
Box(x+30,y+30,40,40,RGBA(255,0,0,0))
;
x = x+130
DrawingMode(#PB_2DDrawing_AlphaBlend|#PB_2DDrawing_Transparent)
DrawText(x,y-25,"channel",RGBA(255,0,0,255))
DrawingMode(#PB_2DDrawing_AlphaChannel)
Box(x,y,40,40,RGBA(255,0,0,255))
Box(x+10,y+10,40,40,RGBA(255,0,0,128))
Box(x+20,y+20,40,40,RGBA(255,0,0,128))
Box(x+30,y+30,40,40,RGBA(255,0,0,0))
;
Next row
StopDrawing()
;
ImageGadget(#g_image,0,0,870,6*130,ImageID(#i_result))
Repeat
event = WaitWindowEvent()
Until
event = #PB_Event_CloseWindow Or event = #PB_Event_Menu
Not as
sexy as the example included with PureBasic, but I think perhaps somewhat
more useful ;-) On my machine the code above results in this:
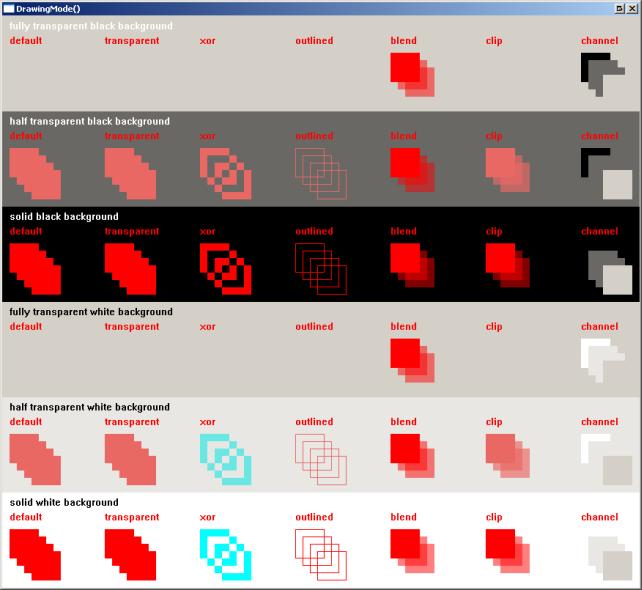
Notice
that the 'mode' called 'transparent' mode doesn't seem to do much...
DrawText()
Pre
4.40 you would have two basic options to draw text: 'default' and 'transparent'.
These still exist, and both modes do not affect the alpha channel, as the
following code demonstrates:
;
survival guide 6_3_210 drawing mode
;
pb 4.60b4
;
Enumeration
#w_main
#g_image
#i_blob
#i_result
EndEnumeration
;
OpenWindow(#w_main,10,10,500,500,"DrawingMode()",#PB_Window_ScreenCentered|#PB_Window_SystemMenu)
AddKeyboardShortcut(#w_main,#PB_Shortcut_Escape,1)
CreateImage(#i_blob,100,100,32)
CreateImage(#i_result,500,500,32)
;
StartDrawing(ImageOutput(#i_blob))
;
; create an image containing a red circle on a transparent background
;
DrawingMode(#PB_2DDrawing_AlphaChannel)
Box(0,0,100,100,RGBA(0,0,0,0))
DrawingMode(#PB_2DDrawing_AlphaBlend)
Circle(50,50,20,RGBA(255,0,0,255))
StopDrawing()
;
StartDrawing(ImageOutput(#i_result))
;
; turn all dark grey, then make the right half transparent
;
DrawingMode(#PB_2DDrawing_AlphaBlend)
Box(0,0,500,500,RGBA(64,64,64,255))
DrawingMode(#PB_2DDrawing_AlphaChannel)
Box(250,0,500,250,RGBA(0,0,0,0))
;
For m = 0 To 1
For n = 0 To 1
y = 30+m*250
x = 60+n*250
;
; create the image
;
DrawingMode(#PB_2DDrawing_AlphaBlend)
DrawImage(ImageID(#i_blob),x+10,y)
;
; a box with some superimposed text
;
Box(x+15,y+90,100,100,RGBA(255,255,255,255))
DrawingMode(#PB_2DDrawing_Default)
DrawText(x,y+100,"default",RGB(0,0,0),RGB(255,0,0))
DrawingMode(#PB_2DDrawing_Transparent)
DrawText(x,y+120,"transparent",RGB(0,0,0),RGB(255,0,0))
DrawingMode(#PB_2DDrawing_XOr)
DrawText(x,y+140,"xor xor",RGBA(0,0,0,128),RGBA(255,0,0,128))
DrawingMode(#PB_2DDrawing_AlphaBlend)
DrawText(x,y+160,"alphablend",RGBA(0,0,0,128),RGBA(255,0,0,128))
Next n
Next m
;
; change alpha channel for bottom left to fully transparent
; and change alpha channel for bottom right to solid
;
DrawingMode(#PB_2DDrawing_AlphaChannel)
Box(250,250,250,250,RGBA(0,0,0,255))
Box(0,250,250,250,RGBA(0,0,0,0))
;
DrawingMode(#PB_2DDrawing_AlphaBlend)
FrontColor(RGBA(255,255,255,255))
BackColor(RGBA(0,0,0,0))
DrawText(10,10,"on solid background")
DrawText(260,10,"on transparent background")
DrawText(10,260,"draw on solid background")
DrawText(10,280,"then change all alpha to transparent")
DrawText(260,260,"draw on transparent background")
DrawText(260,280,"then change all alpha to solid")
StopDrawing()
;
ImageGadget(#g_image,0,0,870,6*130,ImageID(#i_result))
Repeat
event = WaitWindowEvent()
Until
event = #PB_Event_CloseWindow Or event = #PB_Event_Menu
Which
results in this:
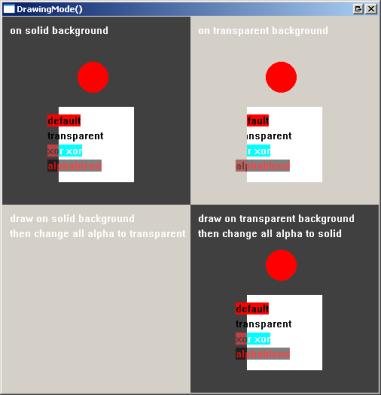
Here's
what you are looking at... First I've made the left half solid dark grey,
and the right half full transparent dark grey. Then on top of that I've
drawn a few objects.
If
you look at the code, you can see how you can draw a 'freestanding' object,
by creating a new image (which I called #i_blob) with a transparent background.
In 'alphablend' mode that image is processed, and all parts that are transparent
are ignored, so only the red dot is left and drawn. Yeah, I sneaked that
one in, I do plead guilty :-) (Hey, it looks a little like a sprite,
I wonder how it compares in speed...)
After
all objects were drawn (with the text objects, from top to bottom, in 'default',
'transparent', 'xor' and 'alphablend' mode I changed the alpha channels
for the lower half. On the left I turned the alpha channel to fully transparent.
Of course, any objects drawn will thus become invisible. A good stunt to
pull on the tax office, but I digress... In the bottom right I changed
the alpha channel from fully transparent to solid. If you compare top right
and bottom right, you can see that some parts of the text were actually
drawn but not displayed. This is because I used drawing modes that would
not affect the alpha channel. Then when I change the alpha channel to solid,
those parts suddenly come visible.
In
pre 4.40 'default' mode text is drawn on a rectangular box. You could of
course set that colour using the BackColor() command, just as you could
set the front color using the FrontColor() command. To place just the text
on top of an existing background PureBasic offered the 'transparent' mode,
in which DrawText() would not draw a rectangular box below the text, but
instead it would draw the text directly on the existing background.
FrontColor(RGB(255,255,255)
BackColor(RGB(255,0,0)
;
DrawingMode(#PB_2DDrawing_Default)
DrawText(10,10,"white
on a red box")
;
DrawingMode(#Pb_2DDrawing_Transparent")
DrawText(10,20,"white
on existing background")
As of
4.40 'default' mode is only useful if you want to draw something without
affecting the existing alpha channel, whilst 'transparent' mode has even
less use. If we use alpha channels, we could replicate the effect of the
code above with the following lines:
DrawingMode(#PB_2DDrawing_AlhaBlend)
DrawText(10,10,"white
on a red box",RGBA(255,255,255,255),RGBA(255,0,0,255))
DrawText(10,20,"white
on existing background",RGBA(255,255,255,255),RGBA(0,0,0,0))
6.4
Sprites and Screens
Now,
with all the alpha channel done it's time to revisit sprites and co...
I've
splitted this subject up into the following sections:
You
may need sufficient hardware (processing power) but do not need an extremely
powerfull video card to use these functions.
6.4.1
Sprites and Screens and the Library Subsystem
Instead
of using the built-in basic 2d drawingWindows
GDI stuff, we're now going to use fancy features of DirectX, which in turn
relies on our hardware to give us those fancy features at maximum speed.
Well, why not... most of us have that hardware installed anyway... (Don't
look guilty! We all like a game now and again...) If you look at the help
file you will find all related commands in the help file under the header
'2D games libraries / sprite and screen'.
The
following applies to all sprite commands:
-
the size
of the sprite should be smaller or equal to the screen
-
'standard'
sized sprites are preferred (16x16 32x32 64x64 128x128 256x256)
-
other
sizes may or may not work, depending on hardware, software and drivers
Unfortunately
it's pretty damn hard to predict what will work, and what not...
Library
Subsystem
PureBasic
actually supports different sets of hard- en software, and you can tell
the compiler what to use, by specifying a 'subsystem'. Go to the menu Compiler
/ Compiler Options. You will find a field 'Librabry Subsystem' there. In
it you can enter the system which you want.
-
nt4 -
DirectX3, some commands may not work
-
no subsystem
specified - DirectX9, may provide some improved performance on newer hardware,
default
-
directx7
- DirectX7, for slightly older hardware
-
opengl
- use OpenGL routines instead of DirectX
Not all
PureBasic commands may work with all systems.
Pre
4.40 used DirectX7 as the default option, DirectX9 in older versions didn't
work too well. 4.40 and later uses DirectX9 as default, but you can still
select DirectX7 using the library subsystem. There's no support (yet) for
anything newer.
Unless
otherwise noted all code examples on these pages use DirectX9.
Here
are some characteristics and / or my experiences with both systems:
DirectX7:
-
supports
#PB_Screen_WaitSynchronization
-
does not
#PB_Screen_SmartSynchronization
-
doesn't
work well in windowed mode
-
isn't
100% smooth
-
IsScreenActive()
works
-
[Alt]+[Tab]
from a full screen can be taken care of
DirectX9
(as of 4.40):
-
supports
#PB_Screen_WaitSynchronization and #PB_Screen_SmartSynchronization
-
works
well in windowed mode
-
appears
to be smoother than DirectX7 (at least the some systems I tested it on)
-
IsScreenActive()
doesn't work well
-
[Alt]+[Tab]
from a full screen is an issue
Sprites.
Again.
Duh.
I just realized I didn't explain what a sprite is. A sprite is a little
blob of pixels that you can place somewhere on the screen. It's a little
bit like an image that you place on top of another image with DrawImage(),
but it uses hardware or more optimized code so is faster, and it can be
used for some fancy things like collision detection.
There
are three different types of sprites:
All the
sprite related commands need 'screens'... I would like to suggest to start
with
regular sprites where we
will touch upon screens as well... Check out
the help file, and read on...
6.4.2
Normal DirectX sprites
These
rely on DirextX (Actually, I think they rely on the discontinued DirectDraw)
and are available on Windows NT, 98, XP. They use hardware acceleration
if possible. Let's have a look at:
InitSprite()
Some
commands can only be used after 'initialising' a library. If you forget
to use the InitSprite() command or one of its brethern, the compiler will
give an error. The idea behind this is that libraries are only included
in the final executable if we actually use them.
So...
Before we can use any of these functions we have to tell PureBasic we are
going to use this library using InitSprite(). The proper way is to check
the result given by InitSprite() to see if the system does support these
functions. (I do tend to forget this, shame on me.) In PureBasic, the screen
commands and sprite commands are closely related and included in the same
library, so there's no additional 'InitScreen()' command necessary.
If
InitSprite() = 0 ; no support for directx7 and those fancy purebasic
graphics commands
...
Else
; ah yes, cool! we can do stuff now...
...
Endif
Now we
can use the commands of this library.
ExamineScreenModes()
Find
out what screen sizes and depths are available:
;
survival guide 6_4_1_100 examinescreenmode
;
pb 4.60b4
;
InitSprite()
ExamineScreenModes()
While
NextScreenMode()<>0
Debug "width "+Str(ScreenModeWidth())
Debug "height "+Str(ScreenModeHeight())
Debug "depth "+Str(ScreenModeDepth())
Debug ""
Wend
OpenScreen()
Output
has to go somewhere... Sprites are not drawn on the regular screen, but
in a dedicated area, either a screen or a windowed screen. When using a
full screen you decide what resolution and colour depth. See te help file
for more details.
OpenScreen(...)
To close
a screen you use CloseScreen(). It is possible to find all available screen
modes using ExamineScreenModes().
You
can only have one screen or windowed screen at any time.
OpenWindowedScreen()
As
an alternative, you may choose to use an existing window and send your
fancy stuff right there. First you have to open a window, and then use
that window for your 'screen' output. The coordinates of that 'windowed
screen' depend on those of the window (think of it as a small 'screen'
located somewhere on the work area of a window).
w_main_h.l
= OpenWindow(...)
OpenWindowedScreen(w_main_h,...)
See the
help file for a list of all parameters for OpenWindowedScreen(). To close
one, you use CloseScreen().
The
following code opens up a window with a windowed screen:
;
survival guide 6_4_2_110 openwindowedscreen
;
pb 4.60b4
;
width
= 640
height
= 480
;
InitSprite()
w_main_nr
= 1
w_main_h
= OpenWindow(w_main_nr,10,10,width,height,"Test",#PB_Window_ScreenCentered|#PB_Window_SystemMenu)
OpenWindowedScreen(w_main_h,0,0,width,height,0,0,0)
;
Repeat
event = WaitWindowEvent()
Until
event = #PB_Event_CloseWindow
;
CloseScreen()
CloseWindow(w_main_nr)
FlipBuffers()
and ClearScreen()
The
trick with screens is that you have TWO buffers for a screen. One that
is shown, and an invisible one that you draw on. Then with a simple command,
you swap the visible one with the invisible one. That way, you can create
a smooth animation onscreen.
StartDrawing(ScreenOutput())
...
StopDrawing()
FlipBuffers()
PureBasic
4.20 with DirectX7 still had some troubles with windowed screens and smooth
screen updates. It looks like 4.40 is a serious step forwards.
Pre
4.40 FlipBuffers() allowed a synchronisation parameter. This has now moved
to the OpenScreen() and OpenWindowedScreen(), due to differences between
DirectX7 and DirectX9.
Make
sure you process all events between flipping images, as in the following
example:
;
survival guide 6_4_2_115 flipbuffers
;
pb 4.60b4
;
width
= 640
height
= 480
;
InitSprite()
InitKeyboard()
;
w_main_nr
= 1
w_main_h
= OpenWindow(w_main_nr,10,10,width,height,"Test",#PB_Window_ScreenCentered|#PB_Window_SystemMenu)
OpenWindowedScreen(w_main_h,0,0,width,height,0,0,0,#PB_Screen_SmartSynchronization)
;
OpenScreen(width,height,32,"Test",#PB_Screen_SmartSynchronization)
;
Repeat
event = WindowEvent()
ExamineKeyboard()
If KeyboardPushed(#PB_Key_Escape)
event = #PB_Event_CloseWindow
EndIf
;
Select event
Case 0
n = n+1
If n > 640
n = 0
EndIf
ClearScreen(RGB(0,0,0))
StartDrawing(ScreenOutput())
For nn = 0 To 32
LineXY(n+nn,0,n+nn,480,RGB(4*nn,0,0))
Next nn
StopDrawing()
FlipBuffers()
EndSelect
Until
event = #PB_Event_CloseWindow
;
CloseScreen()
CloseWindow(w_main_nr)
Of course,
there's some other interesting stuff thrown in there as well...
-
You can
easily change the code from windowed to full screen. You cannot [Alt]+[Tab]
out of the full screen version though, that would need some additional
work.
-
When you're
in full-screen mode you need to grab keyboard input through ExamineKeyboard().
You cannot use AddKeyboardShortcut() or any other regular windows events
when you're running full screen.
-
Synchronisation
(as needed for sprite movement)
is defined by a parameter in the OpenWindowedScreen() or OpenScreen() call.
Ah, interesting!
But for now... we'll waste a little while on sprites first :-)
DirectX9
/ ClearScreen() bug in 4.40
Pre
4.60b4 had some problems with the combination of DirectX9 and ClearScreen()
but only on some videocards. This seems to have been fixed with 4.60b4.
When
using an older version, just replace the following line:
ClearScreen(0)
...
with...
ClearScreen(1)
ClearScreen(0)
It seems
a subsequent ClearScreen() command with the same color doesn't do anything,
by changing the screen background colour it suddenly works. This also seemed
to work:
n
= 1 - n
ClearScreen(RGBA(0,0,0,n))
If you're
suffering this bug, check out the code below, and run it with the line
DisplaySprite() commented and uncommented. Weird, huh?
;
this bug only shows up on some systems, and seems to be solved with pb4.60b4
;
InitSprite()
InitKeyboard()
;
w_main_h
= OpenWindow(1,10,10,300,300,"DrectX9 + ClearScreen()",#PB_Window_ScreenCentered|#PB_Window_SystemMenu)
OpenWindowedScreen(w_main_h,0,0,300,300,0,0,0,#PB_Screen_SmartSynchronization)
;
Global
i_vectoid_h = CreateImage(1,64,64,32)
StartDrawing(ImageOutput(1))
Box(0,0,63,63,RGB(0,0,0))
FrontColor(RGB(0,255,0))
LineXY(4,60,32,4)
LineXY(32,4,60,60)
LineXY(60,60,32,16)
LineXY(32,16,4,60)
StopDrawing()
CreateSprite(1,64,64,#PB_Sprite_Texture)
StartDrawing(SpriteOutput(1))
DrawImage(i_vectoid_h,0,0)
StopDrawing()
;
Repeat
;
ClearScreen(0)
;
y = (y+1) % 600
x = (x+1) % 800
StartDrawing(ScreenOutput())
Box(0,y,800,20,RGB(255,0,0))
Box(x,0,20,600,RGB(128,128,128))
; DisplaySprite(1,150,150)
StopDrawing()
;
FlipBuffers()
;
event = WindowEvent()
;
Until
event = #PB_Event_CloseWindow
;
CloseScreen()
CloseWindow(1)
Creating
and loading sprites
Before
you can display a sprite you first need to get it or create it :-)
| CreateSprite() |
create
from scratch |
| CatchSprite() |
grab
it from somewhere in memory |
| CopySprite() |
copy
and / or create a new sprite |
| LoadSprite() |
load
a sprite from a file |
| FreeSprite() |
remove
a sprite from memory |
| GrabSprite() |
create
a sprite from a section of the screen |
| CreateSprite3D() |
create
a 3D sprite based upon a normal sprite |
Please
note:
-
format
and optional parameters depend on later use
-
if you
close the (windowed) screen all sprite data is lost
Mmm. Depending
on later use? Yes. When loading or creating images for sprites, you have
to take into account how you are going to use these images later, or what
kind of sprites you are going to use them with. The following flags are
available:
DisplaySprite()
and DisplayTransparentSprite()
can use hardware acceleration so normally you want their images to be loaded
into video memory. If you want to use these two commands inside a StartSpecialFX()
StopSPecialFX() block, it's faster if you load or create the sprites in
normal memory using the #PB_Sprite_Memory flag... Confused? You should
be :-) We'll get back on that. Just remember that you may have to specify
certain parameters with these functions, depending on their later use.
By
default PureBasic supports only bitmap (.bmp) files. However, you can also
use jpeg or other formats by preceding your sprite code with any of the
following commands:
-
UseJPEGImageDecoder()
-
UsePNGImageDecoder()
-
UseTIFFImageDecoder()
-
UseTGAImageDecoder()
-
UseTIFFImageDecoder()
DisplaySprite()
DisplaySprite()
draws a sprite including its background at the specified location.
Although
you can use the regular basic 2D drawing
commands, things are (a lot!) faster when using dedicated PureBasic commands
(sprites and screens stuff). These
rely on DirectX, hardware acceleration, and optimized (thus faster) code.
The
concept is simple and should not be very surprising:
-
create
a sprite
-
draw on
the sprite
-
draw the
sprite on the screen
-
flip buffers
...
;
create an image
;
CreateImage(1,64,64,32)
StartDrawing(ImageOutput(1))
...
StopDrawing()
;
;
draw that image on the sprite
;
CreateSprite(3,64,64)
StartDrawing(SpriteOutput(3))
DrawImage(ImageID(1),0,0)
StopDrawing()
;
;
display the sprite
;
ClearScreen(0)
DisplaySprite(2,200,100)
FlipBuffers()
...
Here's
a complete example, which also offers you a sneak preview to SpecialFX
sprites and 3D sprites. in the code below
sprite no. 3 is a regular sprite, the rest is, euh... fluff :-) Except
that it illustrates one thing: when you create a sprite, you may want to
provide the appropriate flags such as #PB_Sprite_Memory
or
#PB_Sprite_Texture depending on your (future)
use of that specific sprite...
;
survival guide 6_4_2_200 sprites
;
pb 4.60b4
;
InitSprite()
InitSprite3D()
InitKeyboard()
;
ExamineDesktops()
framerate
= DesktopFrequency(0)
flipmode
= #PB_Screen_SmartSynchronization
;
screen_width
= 1280
; screen width
screen_height
= 1024
; screen height
screen_depth
= 32
; color depth
OpenScreen(screen_width,screen_height,screen_depth,"SpriteEngine",flipmode)
;
;
the image used for all sprites
;
CreateImage(1,64,64,32)
StartDrawing(ImageOutput(1))
Box(0,0,63,63,RGB(0,0,0))
FrontColor(RGB(0,255,0))
LineXY(4,60,32,4)
LineXY(32,4,60,60)
LineXY(60,60,32,16)
LineXY(32,16,4,60)
StopDrawing()
;
;
create a sprite for use with specialfx
;
(keep all data in cpu memory to speed up effects)
;
CreateSprite(2,64,64,#PB_Sprite_Memory)
StartDrawing(SpriteOutput(2))
DrawImage(ImageID(1),0,0)
StopDrawing()
;
;
create a 3d sprite
;
(first create a normal sprite with a specific flag
;
then create a 3d sprite using that normal sprite)
;
CreateSprite(3,64,64,#PB_Sprite_Texture)
StartDrawing(SpriteOutput(3))
DrawImage(ImageID(1),0,0)
StopDrawing()
CreateSprite3D(3,3)
;
;
create a regular sprite
;
(as you can see: no flags)
;
CreateSprite(4,64,64)
StartDrawing(SpriteOutput(4))
DrawImage(ImageID(1),0,0)
StopDrawing()
;
Repeat
;
; clear the buffer
;
ClearScreen(0)
;
; a normal drawing object (all software, slowest)
;
StartDrawing(ScreenOutput())
DrawImage(ImageID(1),100,100)
StopDrawing()
;
; a specialfx sprite (all software, slow)
;
StartSpecialFX()
DisplayTranslucentSprite(2,200,100,255)
StopSpecialFX()
;
; a 3d sprite (which uses directx, faster)
;
Start3D()
DisplaySprite3D(3,300,100,255)
Stop3D()
;
; a normal sprite (which uses directx, fastest)
;
DisplaySprite(4,400,100)
;
FlipBuffers()
ExamineKeyboard()
If KeyboardPushed(#PB_Key_Escape)
event = #PB_Event_CloseWindow
EndIf
Until
event = #PB_Event_CloseWindow
;
CloseScreen()
DisplayTransparentSprite()
As
DisplaySprite()
with one exception: all parts of the sprite in a specific colour will be
treated as transparent (thus not be drawn).
You
can specify which color is considered 'transparant' using TransparentSpriteColor().
Simply put: DisplaySprite() draws a square shape and overwrites the background,
whilst DisplayTransparentShape() lets the background 'peek through' the
parts you left 'transparent'.
UseBuffer()
You
can use the regular 2D drawing commands to draw on sprites using StartDrawing(SpriteOutput(sprite_nr)).
To
draw a sprite onto another sprite, you useUseBuffer() with the number of
the sprite the draw on. Use -1 to draw on the regular (buffered) screen:
...
UseBuffer(sprite_nr.l)
DisplaySprite(...)
UseBuffer(-1)
...
6.4.3
SpecialFX sprites
Normal
DirectX sprites are fast. They rely on the system hardware, and are kept
in video memory. As such, the CPU only has to tell the video card where
to put a certain image, and the video card does the rest... put picture
n at x and y. Done.
The
SpecialFX sprites are kept in normal memory, and rely strongly on CPU power.
You should group them together as much as possible, and be concerned about
speed.
Be carefull
how you mix up normal and SpecialFX sprites. If you load or create sprites
that you want to use in a SpecialFX section you will have to specify specific
flags with CreateSprite(), CatchSprite()
etc.
Note
that you can use DisplaySprite() and DisplayTransparentSprite() inside
as well as outside a SpecialFX block. If you plan to use them inside the
block, add the parameter #PB_Sprite_Memory
to CreateSprite() etc. so the sprite data is going to stay in normal memory.
If you don't the sprite image will be copied from video memory to normal
memory before being used and this obviously slow down your program.
StartSpecialFX()
Some
effects are accomplished by the processor, not the video card. These effects
are a lot slower compared with the full hardware DisplaySprite()
command as information is copied from video memory to regular memory, then
processed, and then copied back to video memory. To achieve maximum speed
you should group all of these commands inside a StartSpecialFX() StopSpecialFX()
block.
-
StartSpecialFX()
creates a new block in memory that is used for subsequent drawing
-
all sprite
commands will affect the data in regular memory instead of the frame buffer
-
at StopSpecialFX()
the memory block is copied from main memory back to video memory (to the
invisible frame buffer)
-
to use
DisplaySprite()
or DisplayTransparentSprite()
within a StartSpecialFX() block it's better to load or create the sprite
with the #PB_Sprite_Memory option
-
it's best
to group all SpecialFX sprites together in a StartSpecialFX() StopSpecialFX()
block to minimize the copying of memory between video and regular memory
-
you can
use SpecialFX commands outside the block but that will cause additonal
copying of memory
-
it's fastest
if you specify the #PB_Sprite_Memory flag for all SpecialFX sprites
Pre 4.40
anything drawn directly into videomemory (on a screen) before the StopSpecialFX()
was lost, but this appears to be no longer the case. Good stuff!
Check
the help file for more details on the following SpecialFX sprites... Also
note that you may be able to accomplish the desired effects with real hardware
based 3D sprites.
DisplayTranslucentSprite()
Draws
a semi transparent sprite at the specified location with the specified
transparency. Transparency can range from 0 (100% transparent) to 255 (0%
transparency). Note that any black parts in the sprite are considered 100%
transparent.
-
data can
be any format
-
you can
use DisplaySprite3D()
if you have DirectX7 and don't need collision detection
DisplaySolidSprite()
Draws
a solid (single coloured) sprite at the specified location. Any non-black
pixel in the sprite is replaced with the specified colour.
-
color
0 is always considered transparent
-
use the
#PB_Sprite_Alpha
parameter when loading or creating the data
-
data must
be in 8 bit format (256 colours)
DisplayShadowSprite()
Draws
a shadow sprite at the specified location. Any non-black pixel in the sprite
causes a 50% shadow on the background.
-
color
0 is always considered transparent
-
use the
#PB_Sprite_Alpha
parameter when loading or creating these sprites
-
data must
be in 8 bit format
DisplayAlphaSprite()
Draws
an alpha sprite at the specified location. The grey value of any pixel
in the sprite darkens or lightens the background below the sprite, below
128 darkens, above 128 brightens.
-
use the
#PB_Sprite_Alpha
parameter when loading or creating these sprites
-
data must
be in 8 bit format
-
ChangeAlphaIntensity()
adds or removes an additional R, G or B component to the alpha sprite's
effect
6.4.4
3D sprites
These
are not really 3 dimensional, but use DirectX7 or better, and the underlaying
modern video cards for speed and effect. With the need for DirectX7 these
will not work on Windows NT but do work on 98, 2000 and XP, all with DirectX7
or later installed. 3D sprite commands have nothing to do with the Ogre
3D engine. Standard sprites should be faster, but may not always be.
Not
all video cards support all 3D sprite functions and / or parameters.
You
will have to test your software on different hardware platforms, especially
if you plan to support older hardware. The keyword here is all,
as there is a lot of incompatibility.
InitSprite3D()
As
usual we have to call this one time before any of the commands from this
library can be used. If the result is 0, there is no support for 3D sprite
commands. Before calling InitSprite3d() you have to call the regular InitSprite().
...
InitSprite()
InitSprite3D()
...
It is
important to test your program on different hardware and avoid using combinations
or commands that will not work on specific machines. Check especially for
the effects of Sprite3DBlendingMode() on older hardware, and irregular
sprite sizes (other than 16x16 32x32 64x64 128x128 256x256).
Notice
that these sprites, though generated by hardware, are drawn into video
memory. In other words, you can re-draw them on different positions as
many times as you like. (This to all C64 users that once did sprites on
their old 6502 :-))
Start3D()
All
3D sprite commands should be grouped together inside a Start3D() Stop3D()
block, just like StartSpecialFX() StopSpecialFX(). No other sprite commands
should go inside this block! The results are displayed after a FlipBuffers().
I'm
not sure if the ClearScreen() command should go into the block or not,
it doesn't seem to matter much.
CreateSprite3D()
Creates
a 3D sprite using a 2D sprite for texture and image.
You
cannot directly draw on a 3D sprite, or create it from scratch. First create
a regular 2D sprite using the #PB_Sprite_Texture
option. You cannot draw directly on a 3D sprite. You can reuse the 2D sprite
as a template for as many 3D sprites as you want.
LoadSprite(1,"data\geebee2.bmp",#PB_Sprite_Texture)
CreateSprite3D(1,1)
CreateSprite3D(2,1)
3D sprites
1 and 2 have the size and contain the image of normal sprite number 1.
DisplaySprite3D()
Draws
the specified sprite at the given location with a given transparency.
For
systems without (decent) hardware accelleration or to use collission detection
use SpecialFX's DisplayTranslucentSprite().
For systems with limited hardware (old NT clunkers :-)) use DisplaySprite()
or DisplayTransparentSprite()
.
ZoomSprite3D()
Changes
the size of a sprite.
RotateSprite3D()
Rotates
a sprite. This command rotates a sprite by a preset degree, clockwise,
with 0 pointing to the top of the screen. With the parameter 'mode' set
to 0 the rotation is absolute, with 'mode' set to 1 it is relative (to
the last orientation).
When
running this code, you may also notice that the 'rocks' are rotating faster,
but that's becuase they ARE rotated faster (the same sprite is rotated
5 times vs. the 'vectoid' only one time. Have a good look at the code...
This
is the second sneak preview on this page for moving
sprites. I've also made some use of structures,
a linked list, and the With
/ EndWith command, to manipulate an almost arbitrary number of objects
number of objects. (Change 5 to 500 in lines 92 and 114 to get a little
christmas feeling, it will also confirm my claim about the rotation speed
:-))
;
survival guide 6_4_4_150 rotatesprite3d
;
pb 4.60b4
;
Enumeration
#w_main
#i_vectoid
#i_rock
#spr_player
#spr_rock
;
#f_exit
#f_none
EndEnumeration
;
Structure
object
x.l
y.l
width.l
height.l
dx.l
dy.l
sprite_nr.l
EndStructure
;
Global
NewList objects.object()
;
screen_width
= 1680
screen_height
= 1050
screen_depth
= 32
;
ExamineDesktops()
framerate
= DesktopFrequency(0)
;
InitKeyboard()
InitSprite()
InitSprite3D()
;
;
OpenScreen(screen_width,screen_height,screen_depth,"Test",#PB_Screen_NoSynchronization)
;
OpenScreen(screen_width,screen_height,screen_depth,"Test",#PB_Screen_WaitSynchronization)
;
;
framerate = 120
;
SetFrameRate(framerate)
;
i_vectoid_h
= CreateImage(#i_vectoid,64,64,32)
StartDrawing(ImageOutput(#i_vectoid))
Box(0,0,63,63,RGB(0,0,0))
FrontColor(RGB(0,255,0))
LineXY(4,60,32,4)
LineXY(32,4,60,60)
LineXY(60,60,32,16)
LineXY(32,16,4,60)
StopDrawing()
;
i_rock_h
= CreateImage(#i_rock,64,64,32)
StartDrawing(ImageOutput(#i_rock))
Box(0,0,63,63,RGB(0,0,0))
FrontColor(RGB(255,255,255))
LineXY(4,60,32,4)
LineXY(32,4,60,60)
LineXY(60,60,38,16)
LineXY(38,16,54,6)
LineXY(54,6,43,34)
LineXY(43,34,60,60)
LineXY(60,60,10,35)
LineXY(10,35,4,60)
StopDrawing()
;
CreateSprite(#spr_player,64,64,#PB_Sprite_Texture)
CreateSprite3D(#spr_player,#spr_player)
CreateSprite(#spr_rock,64,64,#PB_Sprite_Texture)
CreateSprite3D(#spr_rock,#spr_rock)
;
StartDrawing(SpriteOutput(#spr_player))
DrawImage(i_vectoid_h,0,0)
StopDrawing()
StartDrawing(SpriteOutput(#spr_rock))
DrawImage(i_rock_h,0,0)
StopDrawing()
;
AddElement(objects())
With
objects()
\x = Random(screen_width)
\y = Random(screen_height)
\width = 64
\height = 64
\dx = 1+Random(5)
\dy = 1+Random(5)
\sprite_nr = #spr_player
EndWith
;
For
n = 1 To 5
; *** 5 or 500
AddElement(objects())
With objects()
\x = Random(screen_width)
\y = Random(screen_height)
\width = 64
\height = 64
\dx = -1-Random(5)
\dy = -1-Random(5)
\sprite_nr = #spr_rock
EndWith
Next
n
;
action
= #f_none
Repeat
ExamineKeyboard()
If KeyboardPushed(#PB_Key_Escape)
action = #f_exit
EndIf
;
ClearScreen(0)
Start3D()
For n = 0 To 5
; *** 5 or 500
SelectElement(objects(),n)
With objects()
If \x > screen_width - \width
\dx = -1-Random(5)
EndIf
If \x < 0
\dx = 1+Random(5)
EndIf
If \y > screen_height - \height
\dy = -1-Random(5)
EndIf
If \y < 0
\dy = 1+Random(5)
EndIf
\x = \x + \dx
\y = \y + \dy
;
DisplaySprite3D( \sprite_nr , \x , \y )
ZoomSprite3D( \sprite_nr , 64 , 64 )
RotateSprite3D( \sprite_nr , 1 , 1 )
EndWith
Next n
;
Stop3D()
;
FlipBuffers()
Until
action = #f_exit
CloseScreen()
Sprite3DQuality()
Sets
the image quality of a rotated and / or zoomed sprite. By setting it to
1 the quality improves (smoothes) but makes drawing a little slower.
Sprite3DBlendingMode()
Allows
all sorts of effects, and a major source of incompatibility between different
cards so test well. Here's a link to a MicroSoft page with some combinations:
http://msdn.microsoft.com/library/default.asp?url=/library/en-us/wced3d/html/_wcesdk_dx3d_d3dtextureop.asp
...
and PureBasic seems to add its own 'flavour' to the results, as you can
see in the output of the same code using different
releases of PureBasic on a Windows XP machine...
Anyway,
here is some code that shows different blending mode combinations. You
may want to verify if your specific combination will be visible on other
computers. Unfortunately, there's a bug in 4.40 when using the alpha channel.
It's fine if you load a sprite, but creating one on the fly destroys the
alpha channel...
;
survival guide 6_4_4_200 sprite3d blending mode
;
pb 4.60b4
;
;
*** due to a bug in pb 4.40 you need to run this program with library subsystem
set to directx7
;
UsePNGImageEncoder()
UsePNGImageDecoder()
InitKeyboard()
InitSprite()
InitSprite3D()
;
OpenWindow(1,10,10,8*125+40,800,"Sprite3DBlendingMode()",#PB_Window_ScreenCentered|#PB_Window_SystemMenu)
OpenWindowedScreen(WindowID(1),0,0,8*125+40,760,0,0,0,#PB_Screen_SmartSynchronization)
ButtonGadget(2,8*125-70,765,50,30,"Alpha",#PB_Button_Toggle)
SpinGadget(1,8*125-15,765,50,30,0,15,#PB_Spin_Numeric)
SetGadgetState(1,5)
;
CreateImage(1,100,100,32)
StartDrawing(ImageOutput(1))
DrawingMode(#PB_2DDrawing_AlphaChannel)
Box(0,0,100,100,0)
DrawingMode(#PB_2DDrawing_AlphaBlend)
BackColor(RGBA(0,0,0,0))
FrontColor(RGBA(255,255,255,255))
LineXY(4,95,49,5)
LineXY(5,95,50,5)
LineXY(50,5,95,95)
LineXY(51,5,96,95)
LineXY(95,95,50,85)
LineXY(95,96,50,86)
LineXY(50,85,5,95)
LineXY(50,86,5,96)
FillArea(45,20,-1,RGBA(255,0,0,96))
LineXY(50,6,50,84,RGBA(128,128,128,96))
FillArea(55,20,-1,RGBA(128,128,128,255))
StopDrawing()
;
CreateSprite(1,100,100,#PB_Sprite_Texture)
StartDrawing(SpriteOutput(1))
DrawImage(ImageID(1),0,0)
StopDrawing()
CreateSprite3D(1,1)
;
CreateSprite(2,100,100,#PB_Sprite_Texture|#PB_Sprite_AlphaBlending)
StartDrawing(SpriteOutput(2))
DrawingMode(#PB_2DDrawing_AlphaChannel)
Box(0,0,100,100,0)
DrawAlphaImage(ImageID(1),0,0)
StopDrawing()
CreateSprite3D(2,2)
;
;
unfortunately there's a bug in purebasic 4.40 (and later) when using directx9
;
if you use startdrawing() stopdrawing() on a sprite it wipes the alpha
channel
;
;
code works fine if you would load a sprite from a file, or catch it from
memory
;
the 'fix': either run this program using directx7, or uncomment the next
three lines
;
;
SaveImage(1,GetTemporaryDirectory()+"bug.png",#PB_ImagePlugin_PNG)
;
LoadSprite(2,GetTemporaryDirectory()+"bug.png",#PB_Sprite_Texture|#PB_Sprite_AlphaBlending)
;
CreateSprite3D(2,2)
;
s
= 5
a
= 0
Repeat
event = WindowEvent()
eventtype = EventType()
eventgadget = EventGadget()
Select event
Case #PB_Event_Gadget
Select eventgadget
Case 1
s = GetGadgetState(1)
Case 2
a = GetGadgetState(2)
EndSelect
EndSelect
;
ExamineKeyboard()
If KeyboardPushed(#PB_Key_Escape)
event = #PB_Event_CloseWindow
EndIf
If event = 0
ClearScreen(0)
StartDrawing(ScreenOutput())
Box(0,380,8*125+40,410,RGB(255,255,255))
StopDrawing()
For y = 0 To 1
For xx = 0 To 1
For x = 0 To 7
RotateSprite3D(1,angle,#PB_Absolute)
RotateSprite3D(2,angle,#PB_Absolute)
Start3D()
Sprite3DBlendingMode(s,xx*8+x)
DisplaySprite3D(1+a,20+x*125,30+xx*170+y*390)
DisplaySprite3D(1+a,40+x*125,50+xx*170+y*390)
Stop3D()
StartDrawing(ScreenOutput())
DrawingMode(#PB_2DDrawing_Transparent)
DrawText(60+x*125,160+xx*170+y*390,Str(s)+" , "+Str(xx*8+x),RGB(255,255,255)*(1-y))
StopDrawing()
Next x
Next xx
Next y
angle = (angle+1) % 360
FlipBuffers()
EndIf
Until
event = #PB_Event_CloseWindow
;
CloseScreen()
CloseWindow(1)
Here
is a little table with links to a few executables, and the results with
and without blending:
460b3dx7.zip
- none - alpha
460b3dx9.zip
- none - alpha
460b4dx9.zip
- none - alpha
With
'fix' (saving intermediate image to disk):
460b3dx7.zip
- none - alpha
460b3dx9.zip
- none - alpha
460b4dx9.zip
- none - alpha
6.4.5
Tabbing out
(Unfortunately
I have no clue what I'm doing here, I just grabbed it somewhere, and it
seems to work.)
When
your program uses a windowed screen, a window, or a full screen, you may
have to take some steps to make sure it behaves well with the rest of your
system. Here are some caes and solutions...
Windowed
screen
A windowed
screen is a screen in a window. Duh. Brilliant! Sometimes I even amaze
myself... not.
If
you have a windowed screen you will have to handle the windows events as
well, so your event loop should retrieve them and process them, and make
sure there are no more messages waiting before continuing with the graphical
side of business. You must make sure you process all windows events properly,
before continuing with the screen / graphics parts. Here's a framework
for a windowed screen. Press either [Esc] or [Space] or [Alt]+[F4] to exit.
;
survival guide 6_4_5_100 windowed screen event handling
;
pb 4.60b4
;
InitSprite()
InitKeyboard()
;
OpenWindow(1,10,10,800,600,"Windowed
screen",#PB_Window_ScreenCentered|#PB_Window_SystemMenu)
AddKeyboardShortcut(1,#PB_Shortcut_Escape,1)
OpenWindowedScreen(WindowID(1),0,0,800,600,0,0,0,#PB_Screen_SmartSynchronization)
;
exit
= #False
Repeat
event = WindowEvent()
event_menu = EventMenu()
Select event
Case #PB_Event_CloseWindow
;
; window was closed
;
exit = #True
;
Case #PB_Event_Menu
;
; a menu or keyboard shortcut was used
;
Debug event_menu
Select event_menu
Case 1
exit = #True
EndSelect
;
Case 0
;
; which means no more events, we can now process screen and sprites stuff
;
; first handle any keyboard events
; (make sure you do not process the same keys twice, ie. here and as a
windows event)
;
ExamineKeyboard()
If KeyboardPushed(#PB_Key_Space)
exit = #True
EndIf
;
; do graphical stuff
;
ClearScreen(0)
y = (y+1) % 600
x = (x+1) % 800
StartDrawing(ScreenOutput())
Box(0,y,800,20,RGB(255,0,0))
Box(x,0,20,600,RGB(128,128,128))
StopDrawing()
FlipBuffers()
;
EndSelect
Until
exit = #True
;
CloseScreen()
CloseWindow(1)
Full
screen
A full
screen program may have no regular window, thus may not have to process
windows events. (In fact it seems like it can't even process them.) But...
here you must make sure that your screen is active and visible, ie. in
front!. A user can use [Alt]+[Tab] and move your application to the background...
And if it is not active and in the foreground, anything you draw on-sceen
to may cause your program to crash! (Frankly, it would have been better
if PureBasic would have handled this in the background, but thus far that
is not the case.)
There
are two approaches to solving this problem: either block [Alt]+[Tab], or
make sure you're not drawing anything as long as your screen is in the
background.
First
let's show the problem. Run the following code and hit [Alt]+[Tab], then
try to activate the program again. You'll error out.
;
survival guide 6_4_5_200 full screen alt tab handling
;
pb 4.60b4
;
InitSprite()
InitKeyboard()
;
OpenScreen(800,600,32,"Full
screen",#PB_Screen_SmartSynchronization)
;
exit
= #False
Repeat
ExamineKeyboard()
If KeyboardPushed(#PB_Key_Space)
exit = #True
EndIf
If KeyboardPushed(#PB_Key_Escape)
exit = #True
EndIf
;
; do graphical stuff
;
ClearScreen(0)
y = (y+1) % 600
x = (x+1) % 800
StartDrawing(ScreenOutput())
Box(0,y,800,20,RGB(255,0,0))
Box(x,0,20,600,RGB(128,128,128))
StopDrawing()
FlipBuffers()
;
Until
exit = #True
;
CloseScreen()
All DirectX
programs face this problem, but indeed it would have been nice if PureBasic
would have hidden the issue from us...
This
works with DirectX7 but not with DirectX9. (Inspired by a snippet on a
french website which mentioned B-games,
but somehow I managed to lose the direct link to the original message /
snippet, sorry.) It's not perfect, as when you reactivate your program
your mouse pointer may do funny things. (On my screen some windows elements
sometimes 'flicker through' when the mouse pointer is moved over the area
where they are located.)
;
survival guide 6_4_5_210 full screen alt tab handling
;
pb 4.40 directx7
;
pb 4.60b4 directx7
;
;
*** directx7 only
;
InitSprite()
InitKeyboard()
;
OpenScreen(800,600,32,"Full
screen",#PB_Screen_WaitSynchronization)
;
exit
= #False
Repeat
ExamineKeyboard()
If KeyboardPushed(#PB_Key_Space)
exit = #True
EndIf
If KeyboardPushed(#PB_Key_Escape)
exit = #True
EndIf
;
; do graphical stuff
;
ClearScreen(0)
y = (y+1) % 600
x = (x+1) % 800
StartDrawing(ScreenOutput())
Box(0,y,800,20,RGB(255,0,0))
Box(x,0,20,600,RGB(128,128,128))
StopDrawing()
FlipBuffers()
;
If IsScreenActive()
Else
Repeat
Delay(20)
FlipBuffers()
Until IsScreenActive()
EndIf
;
Until
exit = #True
;
CloseScreen()
Maximized
windowed screen
My
own invention :-) (though probably used by countless others before)...
Create a borderless window, maximize it, and put the screen on top of it.
This DOES work with pb 4.40 AND DirectX9 (although you still can't create
a sprite from scratch and draw on it without destroying the alpha channel,
this does solve the [Alt]+[Tab] problem with DirectX9).
;
survival guide 6_4_5_220 maximized windowed screen
;
pb 4.60b4
;
InitSprite()
InitKeyboard()
;
ExamineDesktops()
desktop_width
= DesktopWidth(0)
desktop_height
= DesktopHeight(0)
desktop_depth
= DesktopDepth(0)
;
OpenWindow(1,0,0,desktop_width,desktop_height,"Windowed
screen",#PB_Window_BorderLess|#PB_Window_ScreenCentered|#PB_Window_Maximize)
AddKeyboardShortcut(1,#PB_Shortcut_Escape,1)
OpenWindowedScreen(WindowID(1),0,0,desktop_width,desktop_height,0,0,0,#PB_Screen_SmartSynchronization)
;
exit
= #False
Repeat
event = WindowEvent()
event_menu = EventMenu()
Select event
Case #PB_Event_CloseWindow
;
; window was closed
;
exit = #True
Case #PB_Event_Menu
;
; a menu or keyboard shortcut was used
;
Select event_menu
Case 1
exit = #True
EndSelect
;
Case 0
;
; which means no more events, we can now process screen and sprites stuff
;
; first handle any keyboard events
; (make sure you do not process the same keys twice, ie. here and as a
windows event)
;
ExamineKeyboard()
If KeyboardPushed(#PB_Key_Space)
exit = #True
EndIf
;
; do graphical stuff
;
ClearScreen(0)
y = (y+1) % desktop_height
x = (x+1) % desktop_width
StartDrawing(ScreenOutput())
Box(0,y,desktop_width,20,RGB(255,0,0))
Box(x,0,20,desktop_height,RGB(128,128,128))
StopDrawing()
FlipBuffers()
;
EndSelect
Until
exit = #True
;
CloseScreen()
CloseWindow(1)
If the
screen doesn't clear properly, you might suffer the DirectX9
/ ClearScreen() bug.
Window
and screen
You
can have a window as well as a screen open at the same time. I'm not entirely
sure if it comes in useful, but at least it works :-)but only in DirectX7
mode :-(
;
survival guide 6_4_5_300 full screen and a window
;
pb 4.40 directx7
;
pb 4.60b4 directx7
;
;
*** only runs in directx7 !!!
;
InitSprite()
InitKeyboard()
InitMouse()
;
ExamineDesktops()
desktop_width
= DesktopWidth(0)
desktop_height
= DesktopHeight(0)
desktop_depth
= DesktopDepth(0)
;
OpenWindow(1,10,10,200,200,"Window",#PB_Window_ScreenCentered|#PB_Window_SystemMenu)
AddKeyboardShortcut(1,#PB_Shortcut_Escape,1)
ButtonGadget(1,0,0,WindowWidth(1),WindowHeight(1),"Exit")
;
OpenScreen(desktop_width,desktop_height,32,"Screen",#PB_Screen_WaitSynchronization)
;
captured
= #True
exit
= #False
Repeat
;
FlipBuffers()
If IsScreenActive()
;
; screen is active and upfront
;
; handle any keyboard events
;
ExamineKeyboard()
If KeyboardPushed(#PB_Key_Escape)
exit = #True
EndIf
;
; do graphical stuff
;
ClearScreen(0)
y = (y+1) % desktop_height
x = (x+1) % desktop_width
StartDrawing(ScreenOutput())
Box(0,y,desktop_width,20,RGB(255,0,0))
Box(x,0,20,desktop_height,RGB(128,128,128))
StopDrawing()
;
event = WindowEvent()
;
; capture the mouse if necessary
;
If captured = #False
ReleaseMouse(0)
ShowCursor_(0)
captured = #True
EndIf
;
Else
;
; screen is no longer active
;
; release the mouse if necessary
;
If captured = #True
ReleaseMouse(1)
ShowCursor_(1)
captured = #False
EndIf
;
EndIf
;
Repeat
;
; process all windows events
;
If captured
;
; do not wait for events if the screen is in front
;
event = WindowEvent()
event_menu = EventMenu()
event_gadget = EventGadget()
Else
;
; wait for messages if the screen is not in front
;
event = WaitWindowEvent(1024)
event_menu = EventMenu()
event_gadget = EventGadget()
EndIf
;
; process the retrieved message
;
Select event
Case 0
Case #PB_Event_CloseWindow
;
; window was closed
;
exit = #True
;
Case #PB_Event_Menu
;
; a menu or keyboard shortcut was used
;
Select event_menu
Case 1
exit = #True
EndSelect
;
Case #PB_Event_Gadget
;
; a gadget was manipulated
;
Select event_gadget
Case 1
exit = #True
EndSelect
;
EndSelect
;
Until event = 0 Or exit = #True
Until
exit = #True
;
CloseScreen()
CloseWindow(1)
Visit
the next page to learn more about moving
sprites! |


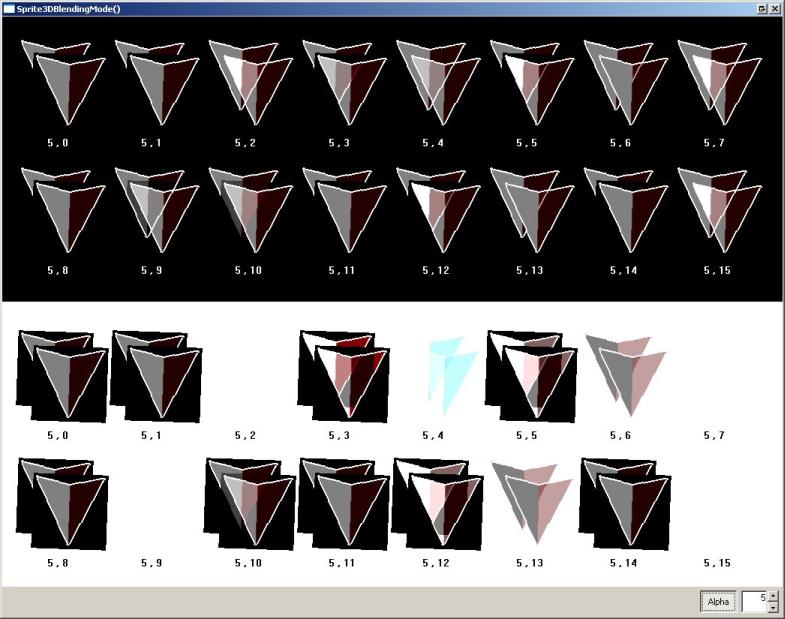
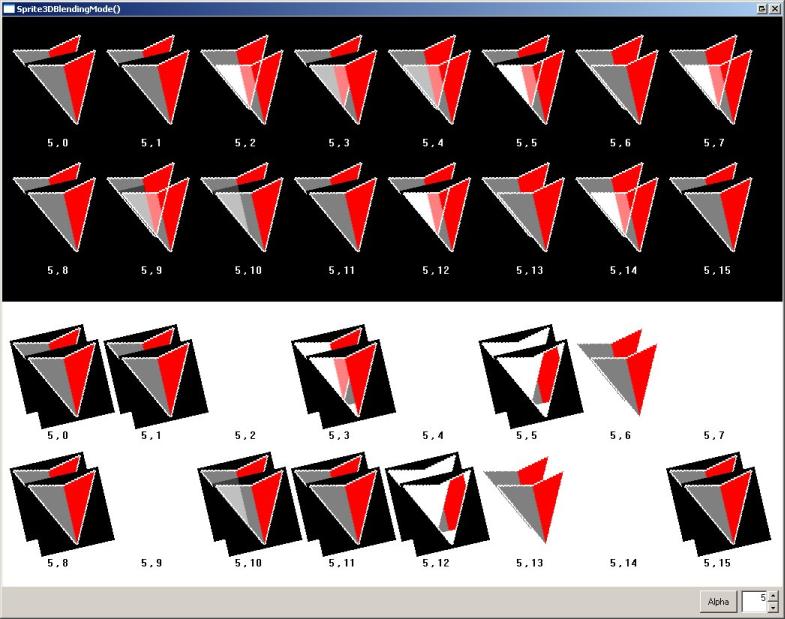
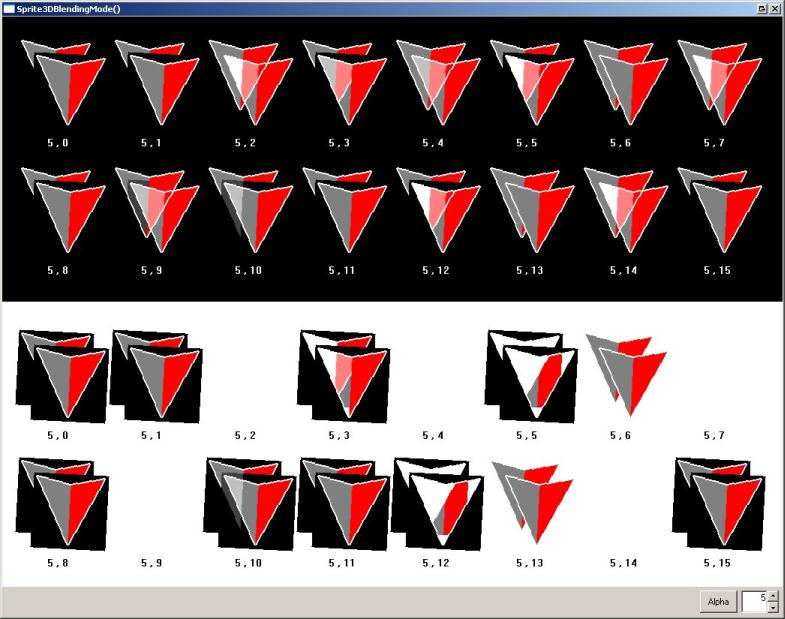
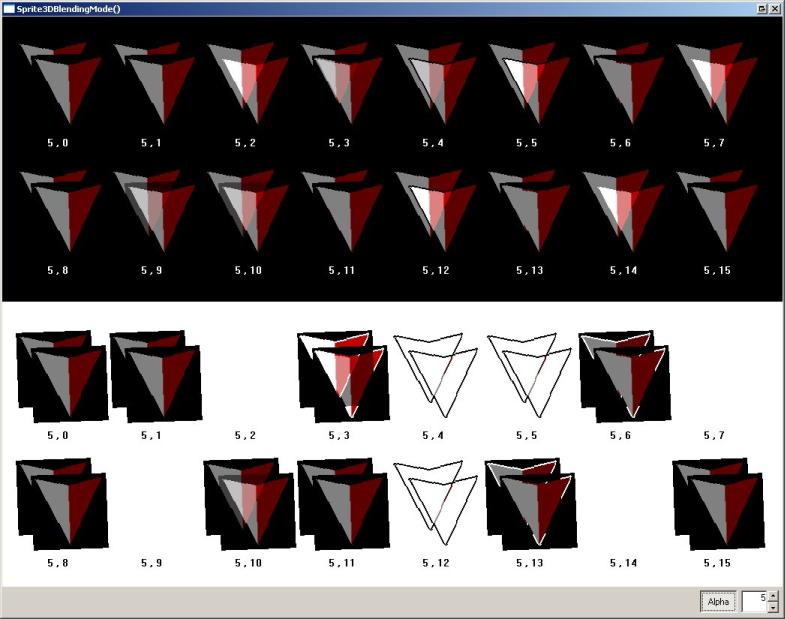
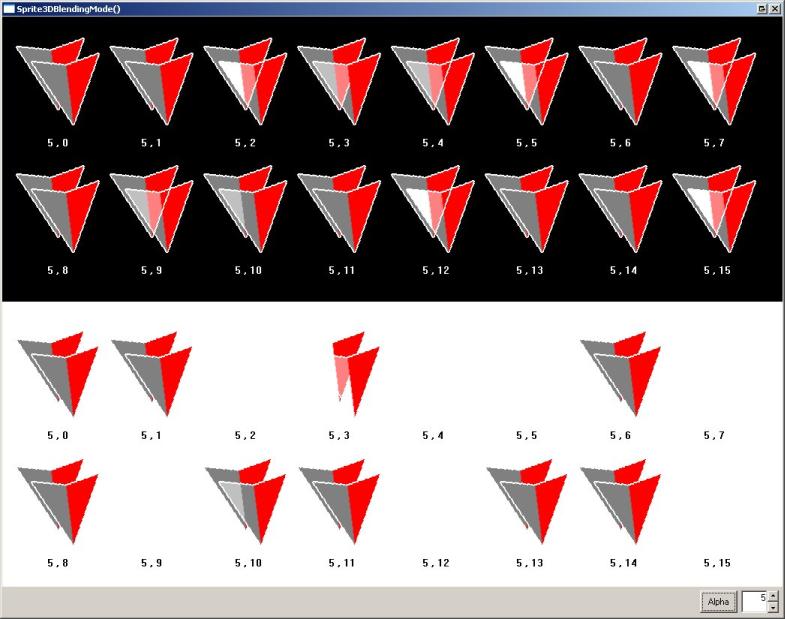
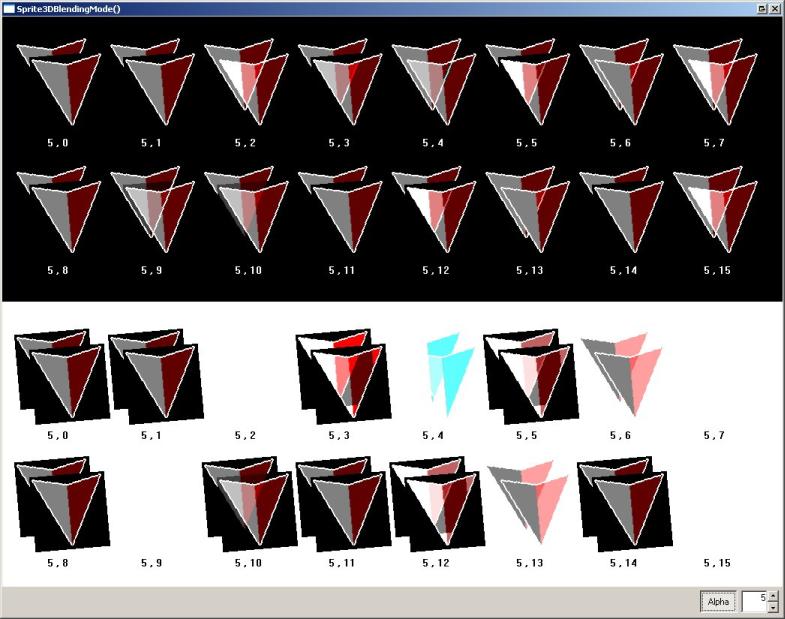
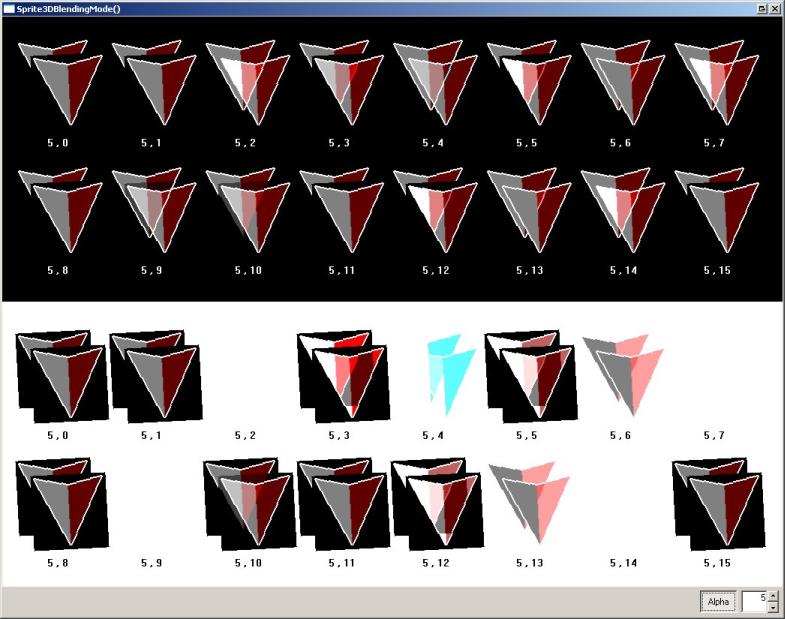